We are super excited to announce that we will be selling charcuterie boards, signs, trays, finished and unfinished slabs at the Hello Handmade Market at Arrowhead Mall in Glendale, AZ on November 13th from 10am to 3pm!
We will be located right outside the entrance to the AMC theatre.
So come visit us and other local makers AND get your holiday shopping done early!
It’s been summer here in the Arizona desert for 2 months now (our summer starts well before the Solstice). After the hottest June on record in Phoenix (seriously), we realized it’s been a while since we’ve posted, and we’ve been doing some exciting things!
As the temps are soaring into the 110’s outside, we move into the garage (a much cooler 100-105 degrees). Luckily, 2 of our employees are fairly heat tolerant; our Jet Planer and our Laguna iQ CNC.
We have been planing lots of slabs that have dried in our natural kiln, aka the backyard. Including some of our highly figured Acacia that we have been drying in a more controlled environment (the garage).
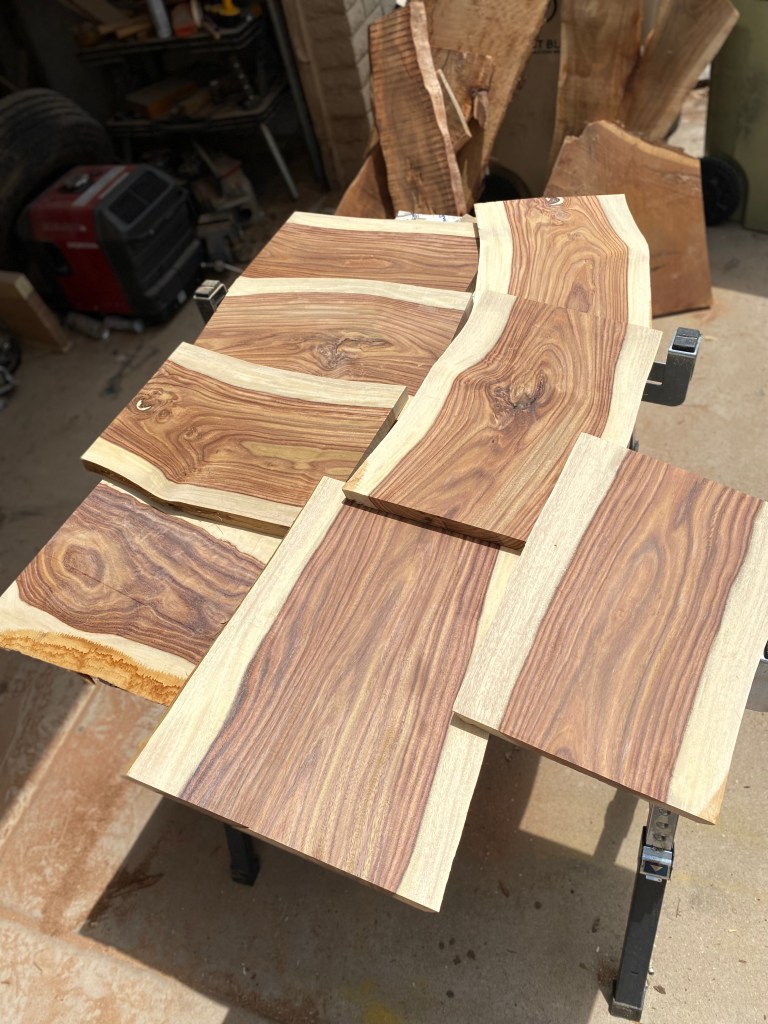
Freshly planed Indian Rosewood boards
We have also been playing around with some different CNC designs; trying out new ones and of course making some of our classics.
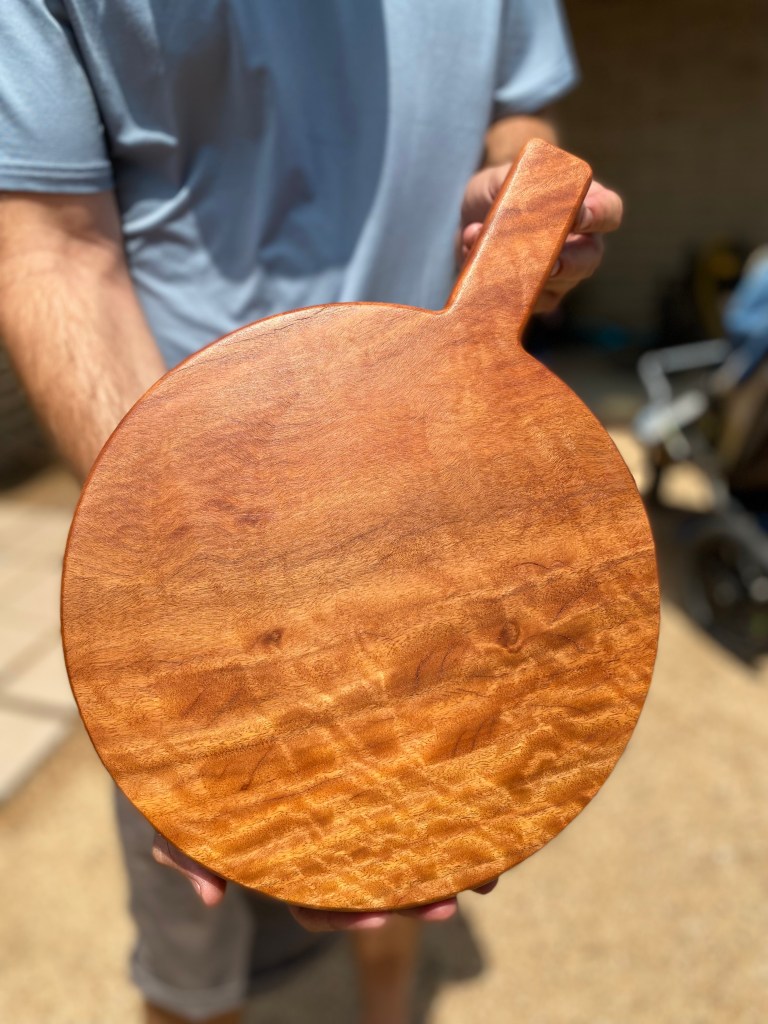
First we decided to try cutting out a round board with a handle. We tested it out on a piece of Indian Rosewood and a piece of Mesquite. After crossing our fingers that the dimensions were correct, we let the CNC do the work. We routered the edges for a nice smooth curve, sanded and finished with a foodsafe Odie’s Oil. The Indian Rosewood sold off of Instagram within half an hour.
Indian Rosewood Round Charcuterie Board
Mesquite Round Charcuterie Board
Needless to say, we loved them! So we decided to go for the full spectrum of hardwoods. Cue Acacia and Microtheca round boards, and another Indian Rosewood for good measure! There are so many possibilities for these boards – charcuterie boards, serving boards for burgers and fries, steaks, pizzas, and anything else you can imagine! We think we will keep this design in the arsenal.
Acacia Round Charcuterie Board
Microtheca Round Charcuterie Board
Another Indian Rosewood Round Charcuterie Board
Next, we decided to do an old design favorite but bring back the real crushed turquoise. We brought back our Tree of Life design on a piece of Indian Rosewood. Years ago we acquired a good amount of Kingman and Sleeping Beauty Turquoise in rough form. We get to use heavy hammers to crush them into powder and small pieces. The finished board sold from Instagram the same day!
Indian Rosewood Tree of Life with Real Crushed Turquoise
We decided to try another new design. A beer flight board. Now, we are not drinkers so we know very little about this world. But, we figured “What the heck! Let’s see how it turns out!” We were able to make 2 flight boards from one piece of Indian Rosewood. We were so excited to see it work out so well!
Indian Rosewood Beer Flight Boards
Some of the most fun we have is coming up with ideas and seeing them to fruition. We are happy to try to work with you if you have any custom woodworking needs.
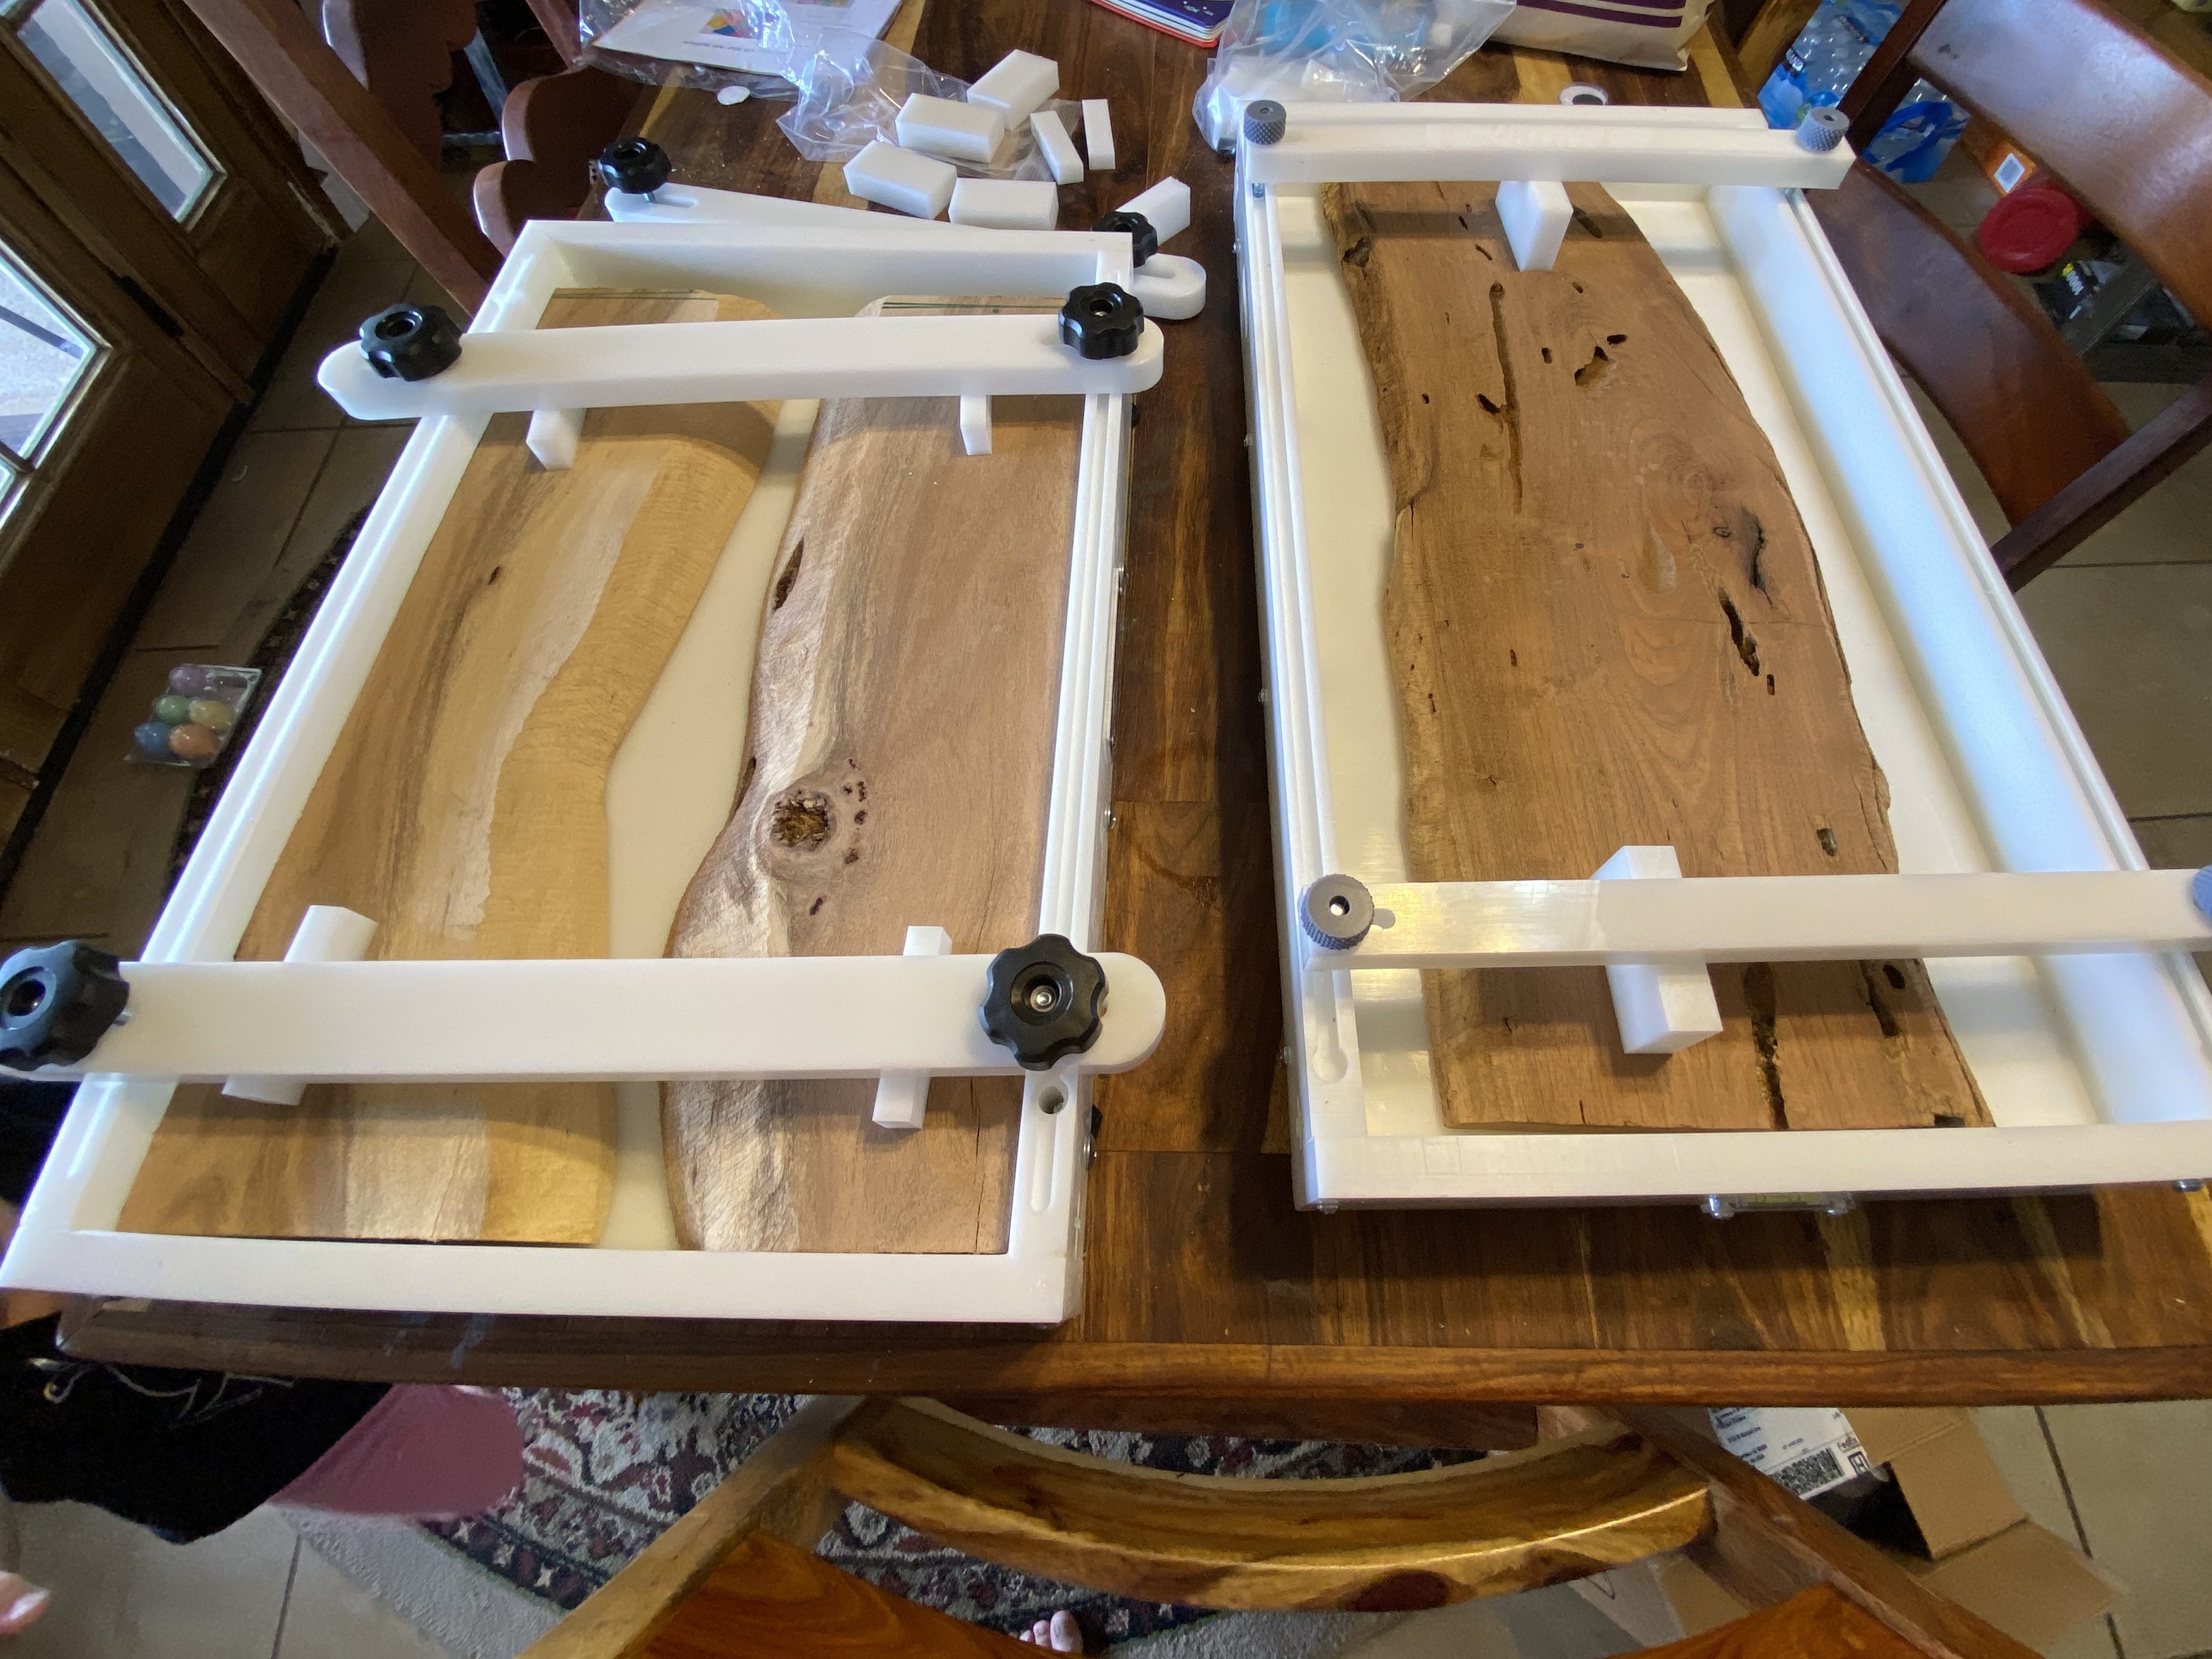
Anybody who has attempted wood and epoxy (or resin) boards has researched the best way to do this. We spent years honing our homemade forms using melamine boards and Tyvek tape. We weighted them down with everything from jade bookends to 5 lb dumbbells (now all covered in epoxy). We had our fair share of leaks from poorly sealed and overused forms. We knew there had to be a better way and we were finally ready to shell out some money for pre-made forms that promised to make our epoxy/wood lives easier.
First we purchased a 24″x12″ form from Slabology Woodworks for about $189 including tax and shipping. Unfortunately it took about 2-3 weeks to receive. We got antsy and ordered a 20.5″x12″ form from Ahonui Artisans for $239, which took 2-3 days to arrive. They both showed up on the same day and we were excited to have multiple pours going at once.
Both of our forms, fresh out of the boxes and ready to build charcuterie boards
First Impressions
We opened both up and here are some of the things we noticed. Both had screw on leveling feet with levels on the front and one side. Now we know our form is level! (This is a big deal that has caused us problems with our own forms in the past). The form from Ahonui Artisans came with 3 – 1.5″ crossbars to hold the wood in place. Slabology Woodworks came with 2 – 1″ crossbars. Both came with an assortment of spacers to go between the wood and the crossbars.
Slabology’s form came with a tube of the silicone they recommend using for the removable ends. Ahonui’s form did not, but recommended the same silicon and came with coupons for pigment. Both forms are labeled with the company’s name, Ahonui’s is a bolted on plague and Slabology’s is a nice sticker (obviously this does not impact the usability of the forms).
Time to Pour
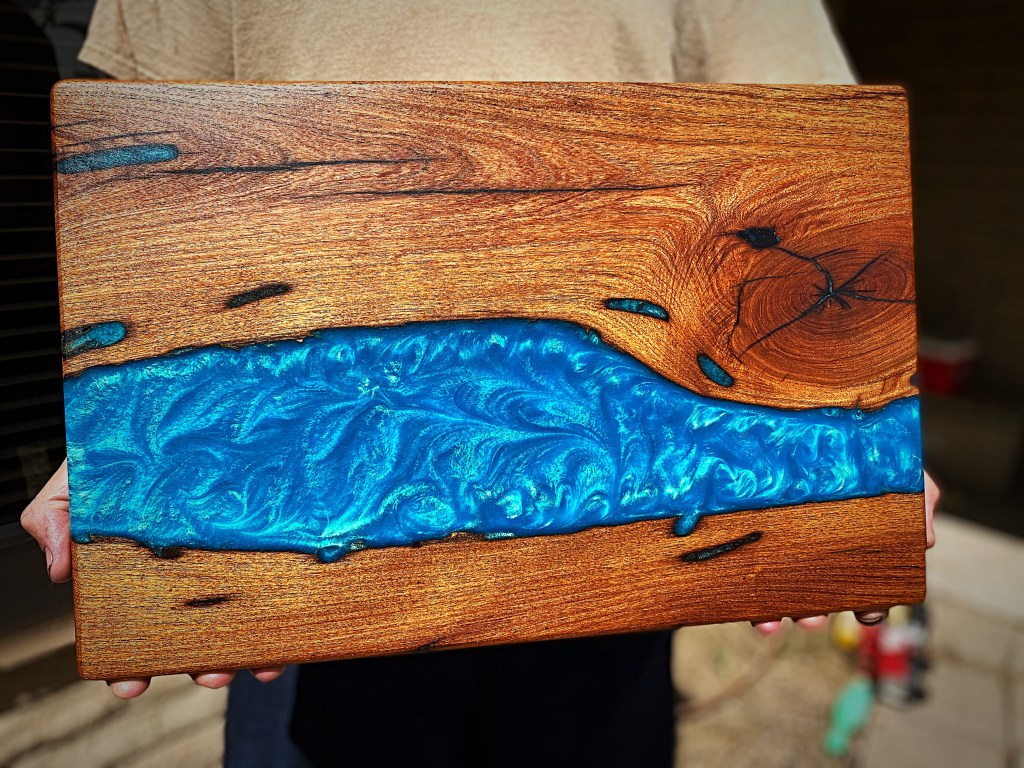
Bryant selected mesquite to make charcuterie boards and put them in both of the forms. We tightened them (but not too tight) with the spacers and crossbars. We used turquoise mica powder (from Just Pigments) and SuperClear Epoxy. We carefully measured the 2 parts of epoxy, mixed them well, and started to pour. It took 2-3 pours to complete the boards.
Mesquite in the forms, ready to pour – Ahonui on left, Slabology on left
Once the pours were hardened and all the holes were filled, it was time to put up or shut up. Taking the boards out of the forms is the most exciting, stressful part of making wood and epoxy boards. Will the board come out or will it break? Did everything get filled? Will we break the forms to get the board out?
We carefully removed the screws holding in the ends of both of the forms. The Slabology form had 6 washers (3 on each side) that came out with the screws. The Anohui form has the washers built in so we didn’t have to keep track of the washers, a definite plus. Up next, we had to pry the boards out. With a little bit of finessing, we were able to get the board out of the Ahonui form with no damage to either the board or the form. The board in the Slabology form was more difficult to get out but we managed. After planing, sanding, routering the edges, and finishing with Odie’s Oil, the boards were complete and Instagram ready. In fact, we sold the board from the Ahonui form within half an hour!
Charcuterie board from Ahonui Artisans form
Charcuterie board from Slabology Woodworks form
After we cleaned the silicone off the form edges, we applied another coat of silicone and re-assembled the forms (and didn’t lose any of the washers from the Slabology form!). After letting the silicone dry, we immediately got more wood ready and made 2 more boards. We were hoping that we would have better luck removing the board from the Slabology form but had similar issues and even scratched the bottom of the form. It is still useable but we were bummed to have scratched our new form.
Second mesquite charcuterie board from the Ahonui form
Second mesquite charcuterie board from the Slabology form
Final Thoughts
Both of these forms are a huge upgrade from the melamine and tape forms that we built in the past. The Slabology form is larger and less expensive than Ahonui’s form, but did take longer to arrive. As mentioned in the post, there are several differences but the most meaningful difference is the difficulty we have had removing the completed board from the Slabology form. The Ahonui Artisans board is a higher quality and worth the extra money (and less time); in fact we already purchased another one.
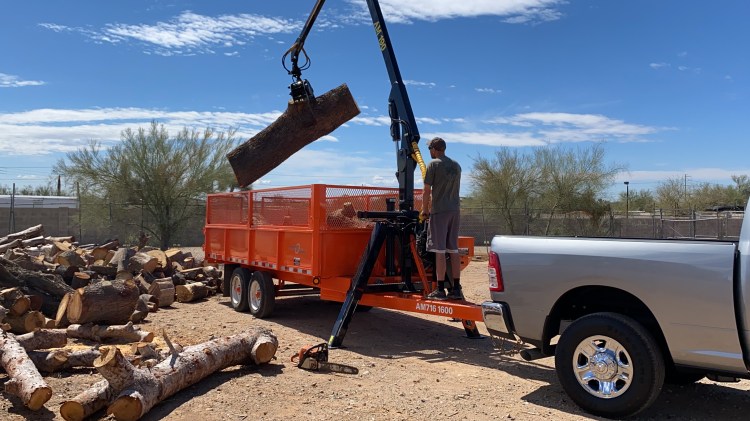
Remember that show “American Pickers”? This is Urban Log Pickers. There are plenty of ways to source logs for lumber, our preferred method for acquiring logs are tree service companies with firewood piles.
What are the necessary tools for pickin’ log yards? A chainsaw (we take a big one and a little one, you never know which you’ll need), a log roller (we like this one), a trailer (grapple not required, but nice for large logs; otherwise you hope the tree service company has a crane they can use to load your logs), a good eye because you never know what you’re going to find.
Last week, we went to a new tree service yard. They took us to “the back yard” and there was a plethora of logs to choose from. We were on a mission to get some pine to cut into fish habitat for Bryant’s day job but we are opportunists. There were several large pines that was already cut into enough material for about 10-12 structures.
Picking up a large pine log with grapple trailer
At this “honey hole” we found several different species of hardwood to cut into different size boards. Mesquite, olive, African sumac burl, and acacia were all in the log pile. We used our handy dandy log rollers to get the logs closer to the safe radius of the grapple. Then, Bryant and the grapple trailer go to work, making life much easier than it used to be.
This week, we milled some Sweet acacia from a different tree service pick, the super dry mesquite and African sumac burl. The Sweet acacia had a nail, which is hard on blades, but the slabs still turned out great!
African Sumac Burl Slabs
Sweet Acacia Slabs
The other nice thing about pickin’ a tree service or firewood yard is that most of these trees had to come down because of disease, they posed a hazard to a home, sidewalk, road, etc., or they were damaged in a storm. This a sustainable source of urban lumber. And, many times tree service companies are happy to have someone take the material off their hands.
Tuesday March 23rd started like any other day. Wake up, grab phone, check Instagram (@dickens_sawmill)… Wait, it says that our account has been “Temporarily Disabled” due to some suspicious activity. Ok, hit “Send code”, double check phone number, press send…no code. “You try your phone” says Bryant. Still no dice. Check it on all the computers in the house. Panic ensues, not really but maybe a little.
We talked about how 4 years worth of time, effort, photos, and followers was potentially gone. We asked friends, who could still see and message our account. We tried again a few times throughout the day, looked for phone numbers to get in touch with IG (more on this below), and sent an email to support. Day 2 – try again, create a dickens_sawmill2 IG. Day 3 – try again, decide to rebrand, delete dickens_sawmill2, research websites. Day 4 – try again, purchase website domain, start building website (liveedgeaz.com), create liveedgeaz IG page. Day 5 – try again, keep building website, start trying to get back some followers. Day 6 – try again, publish website. Day 7 – try again…”Holy crap, we’re back on”, delete liveedgeaz IG, keep website, breathe a sigh of relief.
Here’s what we learned about being locked out of Instagram as a small business:
It’s important to be able to market your business in may different ways, and the more you have control of, the better. Buying a domain for a website assures you have that domain, until you decide not to. Without losing access to Instagram, we may not have been motivated to build the website and look into other methods to market and promote our business.
It takes a long time to gain organic followers. Now don’t get me wrong, we didn’t have 100s of 1000s of followers, but over 1500 real people was an achievement and took lots of posts of several years.
Instagram doesn’t care. There are no actual numbers to contact real people. We sent an email to the support email, and we have no idea if that reached even a computer. Our account was still available to be viewed, which is good and bad. You can tag yourself from your new account, and refer people to your old site to see examples of your products. BUT, you have no control of it. ALL of your old posts, pictures, contact info is still there but you can’t control any of it. The jury is still out on whether or not DMs make it through, but it does appear to the person that sent the DM that it went to you.
It’s a toss up if you will get it back. We were disheartened reading about the droves of people who never regained access to their accounts. We were lucky to get our account back and not feel like 4 years was wasted, only to live in Internet purgatory.
At the end of the day, it doesn’t matter. It’s a tool for our business but it isn’t our whole business. We built a nice website, and started thinking outside the box on how to market ourselves.
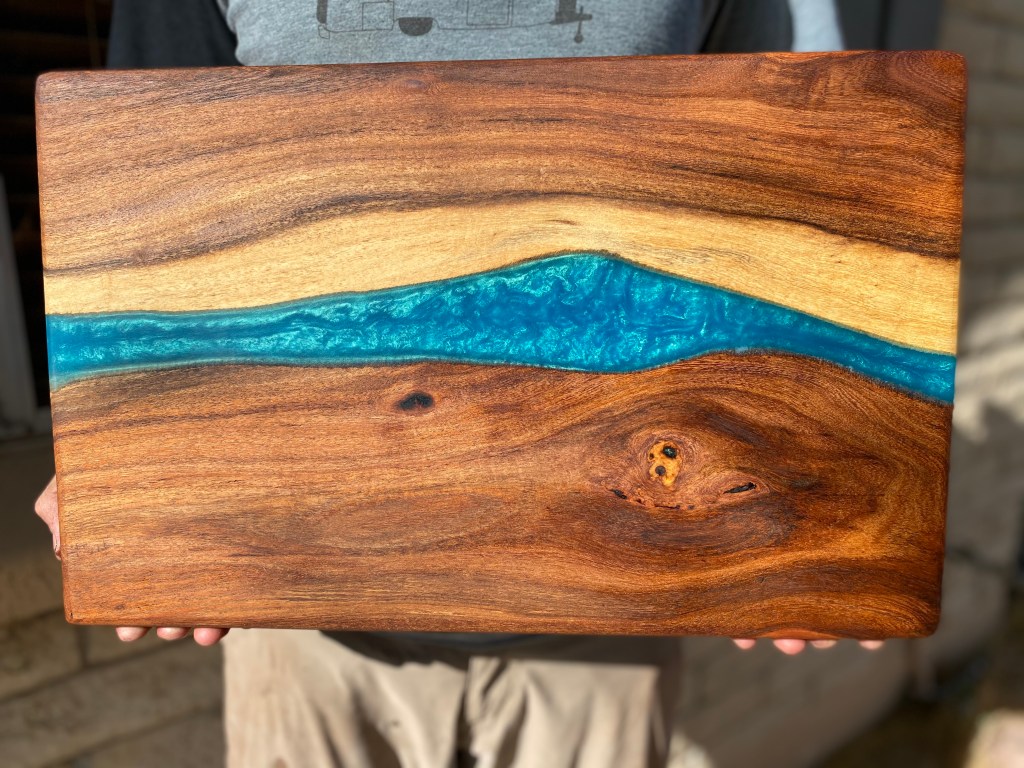
We had a friend reach out to us last week about making a cutting board for her husband’s birthday. This adorable family has a cabin about 2 hours north of their house that is their own private getaway. The even have a logo for their cabin – which is where we come in.
Her husband is a “sucker” for anything about their cabin. She asked if we could take their logo and CNC it on a beautiful board. Beautiful board, check. We have lots of those (if you want to get an idea, check out our gallery). Logo, check. Now we had to put it into our CNC software (we use VCarve Pro).
After playing around in the software, we removed some of the smaller details (like the hills and the small lines in the house. We only had a 60 degree V-bit and knew the small details wouldn’t show up. After making a few more tweaks, we sent the picture to her and got the OK to move forward. “Eeek! I love love it!” was her response.
We saved the file and loaded it onto the CNC. We have a Laguna iQ that we purchased in November and absolutely love. We took a timelapse video to send her to show her kids “how it’s made”.
To make the logo really pop, we filled it with black epoxy. The next day, we (OK, Bryant) sanded the board. Once sanding was complete, Jade finished it with a coat of Odie’s Oil (not an affiliate link, but highly recommend!). Odie’s Oil is a natural, food safe finish that only takes 1 coat to apply and leaves a beautiful, strong finish.
Our friend came to pick up the board yesterday and was ecstatic at how it turned out. We haven’t done a whole lot of custom boards, yet, but we look forward to doing more of them.